
This adorable-looking little chappie should have pride of place on your table this Easter!
As well as being super-cute, this little loaf is completely delicious. Our Easter Bunny Bread usually comes to the table sitting in his vegetable patch – fresh lettuce, carrot sticks, cherry tomatoes, cucumber wedges and broccoli florets. We add a spread or a dip (maybe some salted butter or houmous or a tapenade or some pesto?) and everyone digs in. In other words, this Bunny is the perfect antidote to the Easter Sunday sugar rush!
Or if a veggie platter is not your thing, I think this Bunny would be delicious with a big bowl of vegetable soup instead!
This Bunny is far easier to make than you might think. I use a no-knead method which just requires a bowl and a spoon to make the dough plus a little bit of time. Shaping the loaf is no harder than playing with play-doh – promise! You. Got. This.
This recipe makes sufficient dough for 2 loaves of Easter Bunny Bread. One to keep and one to share.
Easter Bunny Bread is a long-standing tradition in our house. Make it a tradition in your house too!
(Post any questions below this post and I’ll happily do my very best to answer!)
Easter Bunny Bread
A delicious, golden loaf of bread in the form of a bunny, perfect to grace your table this Easter.
Ingredients
500g strong white flour (also known as bread flour)310g semolina flour (also known as simply semolina)
60g sugar
10g instant yeast
15g salt
40g rapeseed oil (or any other neutral oil)
350g water
100g milk
PLUS
1 egg mixed with 1 teaspoon of water or milk to make an eggwash
4 raisins or other similar sized dried fruit for the eyes
Directions
Place both flours, along with the sugar, yeast and salt in a bowl and mix with a spoon to combine. (I use a large mixing bowl with a capacity of at least 3 litres. This is to allow space for the dough to rise. No mixing bowl? Use a large pot or saucepan instead.)

Add the oil, water and milk. Start to mix with a spoon and, as the mixture becomes difficult to stir, switch to using your hands. Squish and squeeze and pummel the dough until it becomes one cohesive mass. It may seem like the dough will not absorb all the flour… fret not! Tear the dough open and use the wetter inside of the dough to pick up all the flour. Repeat until you have picked up all the ingredients in the bowl and you have a rough ball of dough.
The next steps take the place of traditional kneading. While the steps are spread out over 45 minutes, very little active effort is required during this period, so it’s a good time to get on with laundry/mopping the floor/playing board games etc!
-
Leave the dough in the bowl. Take a piece of dough at the edge of the ball of dough and pull it into the centre of the ball. You are sort of folding the dough in on itself. Repeat this approximately 7 or 8 times, all the way around the dough. Then flip the dough so that the smoother side is on top and cover the bowl with a lid, clean towel or cling film. Set a timer for 15 minutes. (With each batch of dough-folding, you will notice the dough getting smoother and easier to work with.)
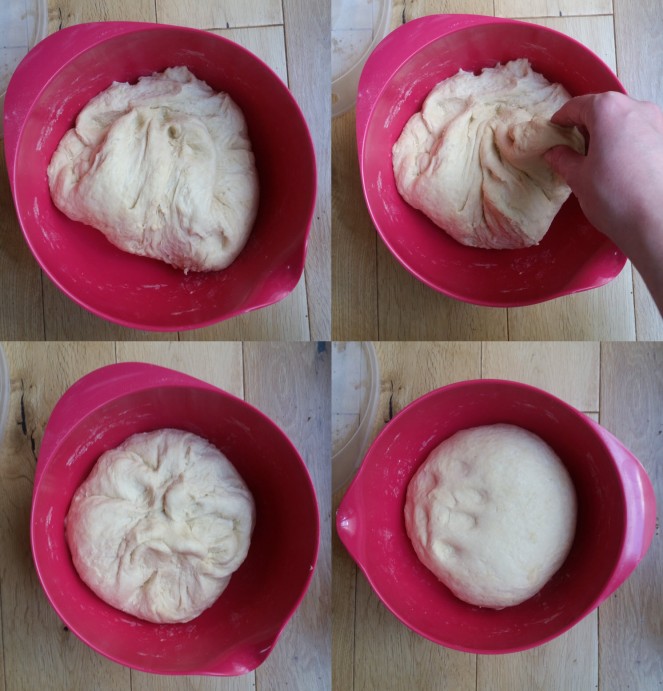
After 15 minutes, flip your dough upside down inside the bowl. Repeat the process of pulling the edge of the dough into the centre, all the way around the ball of dough. Then flip the dough so that the smoother side is on top again. Cover the dough and set a timer for 15 minutes.
Again, flip your dough upside down. Pull the edges of the dough into the centre and flip it back over again. Cover and set a timer for 15 minutes.
Repeat the previous step one final time. In other words, flip the dough, pull the dough from the edges into the centre, flip it back and cover. THIS TIME, however, leave the dough to rise for 1 hour to 1.5 hours at room temperature until it has approximately doubled in size. After the rising period, remove your dough from the bowl. The dough will deflate and shrink a bit in size. This is fine and expected.
Divide the dough in half. You can divide the dough by eye OR use a scale. (The total weight of dough is approximately 1.36kg so each half should weigh approximately 680g.)
To form the bunny you need to separate the dough into 11 balls of varying sizes. I’ve listed approximate weights below to guide you as well as “by eye” notes. Remember – part of the fun of Easter Bunny Bread is his character. No two Easter Bunnies are ever the same!!
1 x head – 150g – a little less than a quarter of the dough
1 x nose – 3g – a tiny little ball – about the size of a small marble or a fresh cranberry
2 x cheeks – 10g each – make each ball about 3 times the size of the nose
2 x hands – 20g each – each ball is about twice the size of the cheeks
2 x feet – 40g each – each ball is about twice the size of the hands
2 x ears – 43g each – each ball is about twice the size of the hands, a little bigger than the feet balls, if possible.
1 x tummy – 300g – a little less than half the dough
Total: 679g

After you have formed the head, nose, cheeks, hands. feet and ears… the remaining dough will be for the tummy. It should be approximately twice the size of the head. (Don’t worry if it’s not exactly 300g – somewhere around 300g is perfectly fine.)
Now, go back to the head ball and flatten it slightly.
Using a scissors, snip 3 cuts in each of the feet to form the bunny toes.
For the ears, take each ball and roll it into a long snake, approximately 20cm in length.
For the tummy, flatten it to approximately the same thickness as the head.
As you work with each ball of dough, keep all the other dough covered as much as possible to prevent it drying out. I usually just throw a clean tea towel over the dough balls as I form them.
Line a large baking sheet with parchment, baking paper or a silpat liner.
Place the bunny body towards the bottom of the baking sheet, leaving enough room to add the bunny feet. Add the feet to the bottom of the body so that the feet are touching the body.

Place the bunny head above, but just touching, the body.
Place the hands at the side, again just touching the body.
For the bunny ears, fold the long lengths of dough in half and position these on either side of the head, just touching it.
Place the bunny cheeks side-by-side, in towards the bottom of the bunny face and pop the nose on top of the cheeks.
Now, cover your bunny and leave to rise for approximately 45 minutes. (10 minutes before the end of the rising time, preheat your oven to 180C.)
Repeat all the steps above with the second half of your dough to make a second loaf.
After the rising time, remove the cover from your bunny and gently brush it all over with the eggwash using a pastry brush or clean paintbrush. Gently push two raisins into the face to form the bunny eyes.
Pop your bunny into the pre-heated oven for 20-22 minutes. When baked, your Easter Bunny Bread should be a gorgeous golden brown. Remove from the oven and allow to cool for 5 minutes before transferring to a wire rack to cool completely. When ready to serve, place the Bunny in his veg patch and bring to the table to a chorus of oohs and aahs!

A whole bunch of notes:
- Although the recipe specifies strong white flour, I often make this bread with half strong white flour and half strong brown flour.
- Semolina is finely ground durum wheat. In the past in Ireland, along with tapioca and pudding rice, semolina was used to make a sweet, milky pudding, typically served to children. It is not as finely ground as flour, and has a slightly grainy feel to it when you rub it between your fingertips. I often sprinkle some semolina in the bottom of a pie crust, before adding the fruit filling. The semolina thickens the fruit slightly as the pie is baked and prevents any fruit juice from spilling out. It’s easily available in supermarkets, usually near the tinned fruit, condensed milk and similar items.
- The semolina gives the bread a lovely sunny yellow hue and a great texture. If you don’t have semolina, you can replace it with an equal quantity bread flour BUT reduce the liquid by approximately 50g to compensate. (This is because semolina absorbs more liquid than regular flour.)
- The sugar in the recipe can be reduced to a minimum of 10g depending on your preference. If you reduce the sugar below 10g, the yeast may take an excessively long time to act.
- You can use an equal quantity of regular dried yeast if you don’t have instant yeast. If using fresh yeast, you should use 30g. Both regular dried yeast and fresh yeast should be activated in a small amount of warm liquid before adding to the flour.
- No! That’s not a typo. The recipe correctly reads 350g water and 100g milk. My preference is to measure liquids by weight (rather than volume) for accuracy.
- Any kind of milk can be used in this recipe e.g. cow’s milk, goat’s milk, almond milk, soya milk.
- Omit the eggwash and brush the dough with milk only if you have no eggs on hand!
- Rather than leaving the dough at room temperature to rise and double in size, you can put the dough in the fridge and allow it to rise for anywhere between 8 and 24 hours. Allow the dough to rest for 30 minutes at room temperature before shaping your loaf. Similarly, when you have shaped your Bunny on the baking sheet, you can put the baking sheet in the fridge to rise for 6 to 12 hours before applying the egg wash and baking.
Source:
All credit to the totally gorgeous and incredibly talented Ms Rebecca Lindamood of Foodie with Family for inspiring this tradition in our home. Rebecca – you are a superstar and I think of you with immense gratitude every year when the Easter Bunny Bread brings such excitement to our kitchen table. Thank you.
Dedication:
For Lisa and for Maebh. Thanks for encouraging me to put this recipe online!

Thanks so much for this Jenni. Can’t wait to try it. Particularly, thanks for the precision which appeals to the statistician (and bakeaphobe) in me!
LikeLiked by 1 person
Thanks so much Lisa!
So glad you like the precise instructions. Great minds!! 😉
And do shout if you have any questions.
LikeLike